
Website Maps: A Tutorial
or: What do you do when there are no instructions because its supposed to be 'intuitive'.
by Glenn Littrell
Whether you use MapQuest, Google Maps, Google Earth or some other mapping software the fundamentals are basically the same. Google Earth is a great personal mapping program but has a slightly harder learning curve due to its added features and power. The samples used here and on my website are from CommunityWalk's website which uses Google Maps. Remember that all mapping software may not use the same terminology as we use here and all map elements may not always appear on all maps, but the basics are here as well as features that may not standout on basic maps. Just use a little imagination when you encounter a term or element that doesn't match up to one of our examples and above all else click it and see what happens. You can always start over.
How 2 Use Website Maps: A Tutorialor: What do you do when there are no instructions because its supposed to be 'intuitive'. | |||||||||||||
Whether you use MapQuest, Google Maps, Google Earth or some other mapping software the fundamentals are basically the same. Google Earth is a great personal mapping program but has a slightly harder learning curve due to its added features and power. The samples used here and on my website are from CommunityWalk's website which uses Google Maps. Remember that all mapping software may not use the same terminology as we use here and all map elements may not always appear on all maps. <>
| |||||||||||||
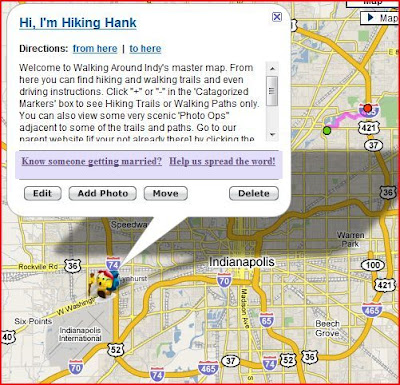
 Marker (Icon) and Label. In this case the smiley figure we call 'Hiking Hank' is a marker that marks a particular spot on the map. The marker's label is sometimes automatically visible on the map when its opened but most map makers will hide them to keep the map from being cluttered. You can usually view the label by hovering the mouse over the marker (object). Path (another object) can also have labels. Marker (Icon) and Label. In this case the smiley figure we call 'Hiking Hank' is a marker that marks a particular spot on the map. The marker's label is sometimes automatically visible on the map when its opened but most map makers will hide them to keep the map from being cluttered. You can usually view the label by hovering the mouse over the marker (object). Path (another object) can also have labels. <> 'Dialog Box' or 'Balloon': Dialog boxes are connected to markers [customized or standard] and are usually not visible upon opening a map. They contain information and options relevant to the marker they are attached to. you open a dialog box by clicking the marker. When you click the marker the map may shift a little to accommodate the opening of the dialog box while keeping the marker visible. You close the dialog box by clicking the 'x' in the upper right hand corner of the dialog box or clicking on an open space outside of the dialog box.The elements of a dialog box:
| |||||||||||||
| <>
| |||||||||||||
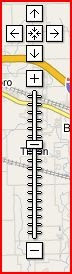
The button on the sliding bar can be can be used to control the zoom by clicking and dragging the button towards the '+' or '-' buttons. You can also click the sliding bar anywhere between the sliding bar button and the '+' or '-' for larger zooms. |
| ||||||||||||
**You can also pan by placing you cursor on the map and clicking and dragging. <> | |||||||||||||
| Paths: Some maps will have marked paths or 'routes. Sometimes these are drawn by the map maker and sometimes they are generated by the mapping software. In some cases the map user can change the path by 'grabbing' a point on the map between the start and finish points and dragging it to another location creating a third point. Grabbing is accomplished by a left click without releasing and dragging the 'mouse' to the new point. | |||||||||||||
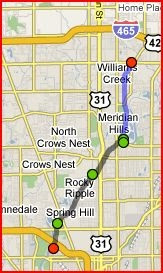
M3/4] Two views of the same trail, generated by the map maker. The green 'marker' and the red 'marker' are the start and end points of the path. The red and green markers in this example are standard markers but if the map maker wanted to he could use custom markers too. Remember that paths can also have labels which these paths do but they are hidden. If this was an 'interactive' map you could see the label by 'hovering' your cursor over the path. | |||||||||||||
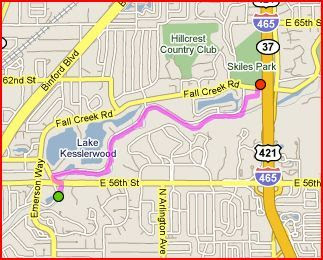 M3] Fall Creek Corridor [Trail] | 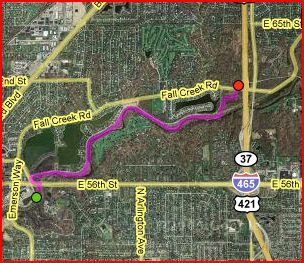 M4] Fall Creek Corridor [Trail] | ||||||||||||
M5] The Central Canal Towpath & The Monon Trails In M5 to the left two trails are shown. The color of the markers are not relevant here but notice that one segment of the trail is blue [The Monon Trail] and the other segment is black [The The Central Canal Towpath]. This is done at the discretion of the map maker. As stated before on some maps you could click and drag on the path or on one of the intermediate markers to create a new intermediate point. | \
NOTE: Sometimes its a good ideal to hover or click on the markers to see if there isn't relevant information on that marker. | ||||||||||||
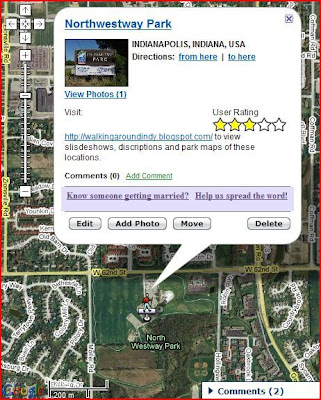
<> Get Driving Directions: As stated above when you click on a marker a dialog box opens up with several elements/features. Among these features is a 'Directions: from here | to here' feature with the 'from here' and 'to here' being links that will open another dialog box where you can obtain detailed instructions for downloading and/or printing. | |||||||||||||
| Map Tools 3] Get Directions: In the example to the right the 'to here' link was clicked. The process is the same if you click 'from here'. There are two 'option' boxes: 'Starting At' and 'Ending At', these are your start and end points and you will notice your ending point [Ending At] is already selected because we clicked on 'to here'. [Don't ask me what the pencil is for in the Ending At box because I don't know. When I click it strange things happen, woooooh. When I find out I'll update this page. In the Starting At box you have two options:
| 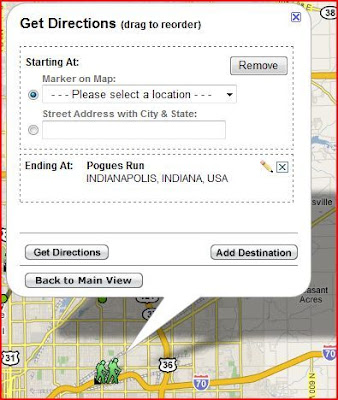 | ||||||||||||
There are also three buttons at the bottom:
| |||||||||||||
***If you wanted to you could have the same start and end points on a map with multiple points creating a circular route. You could even have a sequence which repeated some points such as you leave point A, drop off something at point B, got to point C, D and E, return to point B and pick up something and then return to point A. <> | |||||||||||||
| |||||||||||||
| <> | |||||||||||||
| Map Tools 4] Controlling What Shows: "Clearing the Clutter" | |||||||||||||
As stated above we will now deal with the 'Legend' and related items: | |||||||||||||
A 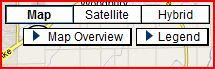 B 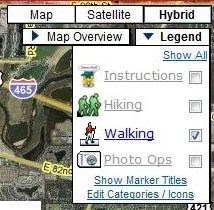 C C | By clicking on the Legend [A] a drop down menu [B] appears . There are four icons [  , , Whenever you visit a map if there are a lot of points of interest, represented by markers, you may find the map is very cluttered. Especially if the markers are large or positioned close together. This could be even worse if all the markers on the map are also labeled. The way map makers get around this, or better yet, make it possible for you to control, is to 'categorize' their markers. In this case each set of icon, title and check boxes represent one of four categories. Instructions, Hiking, Walking and Photo Opps markers. You will notice that in B only the Walking box is checked. In this example only the Walking markers will appear on the map. You control what shows by how many boxes you check or uncheck. If you want all markers to show you can check all 4 boxes or click the 'Show All' link. If you want to display the 'Label' for the Markers click the 'Show Marker Titles' link [which will then change to a 'Hide Marker Titles' link]. Ignore the 'Edit Categories/Icon' link in the example it normally would not be visible to users. Some maps will have a 'tabbed' section [C] which provide additional options and information for users. In C there is a 'tabbed' section with two tabs, 'Locations' and 'Welcome'. In this example clicking the 'Welcome' tab would display that tabs page which contains a welcome message and instructions. | ||||||||||||
| The 'Locations' tab is already selected and in this example contains information similar to what is found in the 'Legends' [B] drop down menu except with additional information. The '-' serve the same purpose as the Legends checkboxes. Clicking a '-' sign is the same as un-checking one of the Legends boxes. It will remove all the corresponding markers from the page, change the '-' to a '+' and collapse the list of markers for that category. Clicking the '+' is the same as checking a box and it will change to a '-' and the list of markers for that category will reappear. Notice that with each marker and marker label/title displayed are little Icons. These are shortcuts to features contained in each markers dialogue boxes. Earlier we explained that if you clicked a marker on the map or a markers label a dialogue box would open with information, maybe a small picture and options for getting driving instructions or viewing that picture[s]. In the Location Tabs clicking on the markers title will do the same but if you click on the little icons instead you will go straight to the those options without opening the dialogue box. Clicking the car icon will take you straight to the get directions box. Clicking the camera icon will take you straight to the enlarged pictures. Notice that not all marker titles have a picture icon because there are no pictures for that marker. The 'Collapse All' and 'Expand All' does the same as 'Show All Markers' and 'Hide All Markers' in the Legend drop down menu. The 'Show Descriptions' and 'Show Addresses' are self explanatory when you click them, if available. The 'Walking Map' link is an Ad [discussed earlier]. | |||||||||||||
<> | |||||||||||||

Ta Daaa!!!! There you have it. There you have it. Now you are a master navigator. A virtuoso of mapology. A guru of getting there. A one person GPS Remember that all mapping software may not use the same terminology as we use here and all map elements may not always appear on all maps and most of all you can't break it if you don't play with it, if you do break it just close the window and whistle.  .  |
| <> |
Copyright © 1992-2013 Glenn D. Littrell www.Glenns-World.com www.glennlittrell.com www.littrellfamily.net  |
No comments:
Post a Comment
[When leaving a comment please don't use the anonymous option in the 'Comment As' drop down box. Please select one of the other identity options. If you don't have any of the listed accounts U can use the Name/URL option. You don't have to use your full or real name you can use a nickname and leave the URL box blank if you want.]