Showing posts with label Misc. Show all posts

How2 Master Computer & Internet Maps

Website Maps:  A Tutorial

or: What do you do when there are no instructions because its supposed to be 'intuitive'.
by Glenn Littrell

Whether you use MapQuest, Google Maps, Google Earth or some other mapping software the fundamentals are basically the same.  Google Earth is a great personal mapping program but has a slightly harder learning curve due to its added features and power.  The samples used here and on my website are from CommunityWalk's website which uses Google Maps.  Remember that all mapping software may not use the same terminology as we use here and all map elements may not always appear on all maps, but the basics are here as well as features that may not standout on basic maps.  Just use a little imagination when you encounter a term or element that doesn't match up to one of our examples and above all else click it and see what happens.  You can always start over. 


How 2 Use Website Maps:  A Tutorial

or: What do you do when there are no instructions because its supposed to be 'intuitive'.

Whether you use MapQuest, Google Maps, Google Earth or some other mapping software the fundamentals are basically the same.  Google Earth is a great personal mapping program but has a slightly harder learning curve due to its added features and power.  The samples used here and on my website are from CommunityWalk's website which uses Google Maps.  Remember that all mapping software may not use the same terminology as we use here and all map elements may not always appear on all maps.
<>
M1]  All Maps on this page are 'static' not 'interactive', except for the 'practice map' which is provided for you to 'play' with.  
By static we mean that clicking on the map will not result in any useful reaction [other than going to where these maps are stored].  If the map was interactive 'clicking' would result in the map changing as described in this tutorial.  As you go thru this tutorial you can scroll down to the interactive map to practice what you learn.
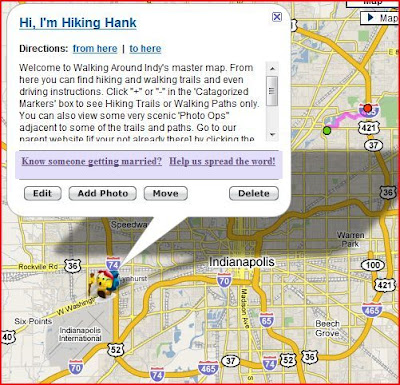
The map here is of Indianapolis and contains several elements you should familiarize yourself with:
  • Marker (Icon).  In this case the smiley figure with red cap and backpack we call 'Hiking Hank' and the red and green dots.  The smiley figure, aka Hiking Hank, is a customized marker and the dots are standard markers.
  • Label.  Not visible here, would normally appear next to the marker or path.
  • 'Dialog Box' or 'Balloon'.  The dialog box provides you with information and several options*.
  • View:  The Street View.  Most map will offer three possible views:
  1. 'Street' (or 'Map')
  2. 'Satellite' (or 'Terrain')
  3. 'Hybrid'
  • 'Path', 'trail' or 'route' The colored line between the green and red markers marks a path or route from one marker to another or multiple markers.
*The four options in this dialog box, at the bottom [Edit, Add Photo, Move, and Delete], will not normally appear at the bottom of dialog boxes that you view. They generally are only visible to the maps creator so ignore them for now.
 
HHank smallMarker (Icon) and Label.  In this case the smiley figure we call 'Hiking Hank' is a marker that marks a particular spot on the map.  The marker's label  is sometimes automatically visible on the map when its opened but most map makers will hide them to keep the map from being cluttered.  You can usually view the label by hovering the mouse over the marker (object).  Path (another object) can also have labels.
<>
'Dialog Box' or 'Balloon': Dialog boxes are connected to markers [customized or standard] and are usually not visible upon opening a map.  They contain information and options relevant to the marker they are attached to.  you open a dialog box by clicking the marker.  When you click the marker the map may shift a little to accommodate the opening of the dialog box while keeping the marker visible.  You close the dialog box by clicking the 'x' in the upper right hand corner of the dialog box or clicking on an open space outside of the dialog box.
The elements of a dialog box:
  • The Title:  In this case "Hi, I'm Hiking Hank" is both a title and a link.  It is also the 'Label" for the marker mentioned above.  Whenever a title is blue and underlined it is also a link that if you click on it you will go to or access another web location or action.  This could be another website, information box or map.  Sometimes if a map is located on several website it may be linked to the page your already on.  If the title is not blue or underlined then it is probably 'static'
  • 'Directions: from here | to here':  If you want to get driving direction to the marker then click 'to here' and a dialog box will open for you to type the address of your point of origin.  Conversely if you click 'from here' the same will happen but the marker will be your starting point and you enter your destination.  You should be able to print the driving instructions from that dialog box.
  • Information:  Most dialog boxes will contain information about or relevant to the marker, in this case instructions for using this particular map in a scrollable dialog box.
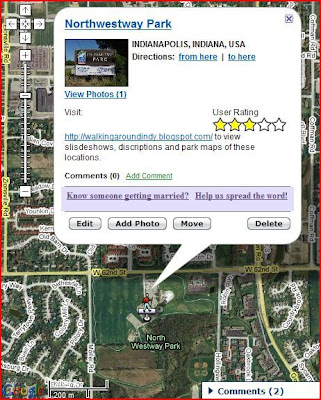
  • 'Comments (0) Add Comments':  Some maps allow you to leave comments about the map, markers, or locations the markers represent.  The number of comments already left appear in the () and can usually be viewed by clicking the word 'comments'.  By click 'Add Comments' you can leave your own comments.  Always consider leaving a comment.  Map makers love it and it helps other viewers of the map or marker.
  • Ads:  CommunityWalk maps (which I use here) are great for making maps they have many features and are free.  I have several maps that I use them to make and keep updated and I can store them on their site for free.  But, for free, isn't always free because there is usually a trade off and in this case it is usually unobtrusive ads such as these two for weddings.  You will notice that my maps and even my websites have similar ads.  In the case of my maps the benefit I get from these ads are the free map and map storage.  In the case of my WebPages the benefit is those ads actually help pay for the websites.  Whenever you click on an advertisement located on my WebPages and blog pages I earn as much as one cent, even if you don't buy a thing or sign up, so consider clicking those links occasionally.  You don't need to click on the ads associated with my maps as there is no additional benefit [except to CommunityWalk] but keep the ads on my other pages in mind, remember when the link opens up a another page you don't have to signup or buy anything.  ps. constantly clicking an add doesn't up the benefit as I only get credit for one 'click' per ad per visit.
  • As mentioned above the four buttons at the bottom of this dialog box, [Edit, Add Photo, Move, and Delete], should be ignored during this tutorial.
<>
View:  The Street View.  Most map will offer three possible views:
  1. 'Street' (or 'Map'): Map M1] above is a map displayed using the 'Street' or 'Map' view.  For most people it is the more familiar view and the easiest to use.
  2. 'Satellite' (or 'Terrain'):  Another view available is the 'Satellite', 'Terrain' or 'Overhead' view.
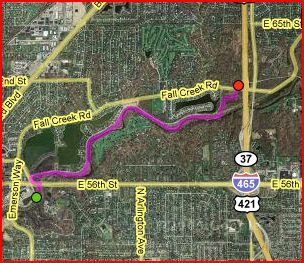
  3. 'Hybrid': Map M2] to the right is a hybrid view which combines the satellite view along with the street view.
  The familiarity of the street view has its obvious advantages but the other two choices also  have advantages.  First of all the satellite view is just so cool.  In some cases you can zoom in and see people walking on the street, look at the lawn chairs on your back yard deck or view the creek bed of your fishing destination.  The satellite view usually can bring you a lot closer to your location than the street view can.  The hybrid view combines the detail of the satellite view while retaining the location labels from the street view.  The satellite and hybrid view helps you find location when viewing the actual structure or terrain might help you locate something that is not depicted or labeled on a normal street map.  For instance a water tower, picnic shelter, or ravine.  In this case the 'Walking' marker is located at the actual starting point of the trail.  The trail, parking lot, and baseball diamonds them selves don't appear on the street map.

M2] This example has two additional features: an additional 'Comments' option and a Navigation Tool.  Notice that the dialog box on this map is also different.  It features a picture and a 'User Rating',
 
  
By clicking the picture you can view a slightly larger picture(s) and the User rating is sometimes used by the map maker to rate the location or something relevant to the location.  This additional 'Comment' option is for leaving comments on the map, not the marker.  You will notice that 2 comments have already been left.


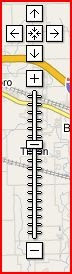
Map Tools 1]   Navigation Tool:
  Some maps will contain a navigation bar so that you can navigate the map.  The elements of the navigation bar are:
  • Direction/Panning:  The four outward pointing arrows are for scrolling the map up, down, left and right.**
  • Return: The four inward pointing arrows are one button for returning to the original view when you opened the map.
  • Zoom: The '+' and '-' buttons and the sliding bar between them is for zooming in and out. 

The '+' button zooms you in incrementally as the '-' button zooms you out.

The button on the sliding bar can be can be used to control the zoom by clicking and dragging the button towards the '+' or '-' buttons.  You can also click the sliding bar anywhere between the  sliding bar button and the '+' or '-' for larger zooms.


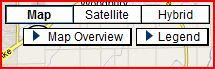
Map Tools 2]   Changing Views:
When present the buttons displayed here can be used to change the views on a map.  If they aren't present then the maker of the map limited the views available.  You switch between 'Map', 'Satellite' and 'Hybrid' by simply clicking the appropriate button.

The 'Map Overview' button will open a small window with a zoomed-out view of

your present view and mark where your present view is.  Sort of a 'you are here' window.  The 'Legend' button will be explained later.

**You can also pan by placing you cursor on the map and clicking and dragging.
<>
Paths: Some maps will have marked paths or 'routes.  Sometimes these are drawn by the map maker and sometimes they are generated by the mapping software.  In some cases the map user can change the path by 'grabbing' a point on the map between the start and finish points and dragging it to another location creating a third point.  Grabbing is accomplished by a left click without releasing and dragging the 'mouse' to the new point.

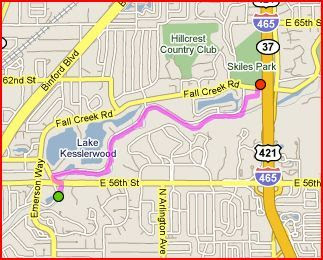
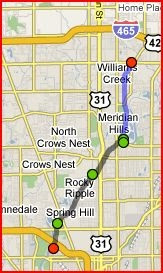
M3/4] Two views of the same trail, generated by the map maker.  The green 'marker' and the red 'marker' are the start and end points of the path.  The red and green markers in this example are standard markers but if the map maker wanted to he could use custom markers too.
Remember that paths can also have labels which these paths do but they are hidden.  If this was an 'interactive' map you could see the label by 'hovering' your cursor over the path.

       
M3] Fall Creek Corridor [Trail]


M4] Fall Creek Corridor [Trail]


M5] The Central Canal Towpath & The Monon Trails

In M5 to the left two trails are shown.  The color of the markers are not relevant here but notice that one segment of the trail is blue [The Monon Trail] and the other segment is black [The The Central Canal Towpath].  This is done at the discretion of the map maker.  As stated before on some maps you could click and drag on the path or on one of the intermediate markers to create a new intermediate point.  

\


NOTE:  Sometimes its a good ideal to hover or click on the markers to see if there isn't relevant information on that marker.


<>
Get Driving Directions:  As stated above when you click on a marker a dialog box opens up with several elements/features.  Among these features is a 'Directions: from here | to here'  feature with the 'from here' and 'to here' being links that will open another dialog box where you can obtain detailed instructions for downloading and/or printing.
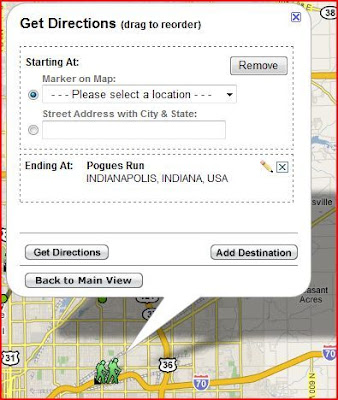
Map Tools 3] Get Directions:
In the example to the right the 'to here' link was clicked.  The process is the same if you click 'from here'.
There are two 'option' boxes: 'Starting At' and 'Ending At', these are your start and end points and you will notice your ending point [Ending At] is already selected because we clicked on 'to here'.  [Don't ask me what the pencil is for in the Ending At box because I don't know.  When I click it strange things happen, woooooh.  When I find out I'll update this page.
In the Starting At box you have two options:
  • Marker on Map: The default option.  If you wanted to go from one marker on the map to your Ending At point you could click the drop down menu and select your marker.
  • Street Address with City & State:  You can type a street address or just a city state here if you want.

There are also three buttons at the bottom:
  • Get Directions: When you are finished click this button and dialog boxes will open with maps and detailed route instructions and print options.
  • Add Destination: Once you've selected your start & end points clicking this will open a third 'option' box.  For you to add a third point on your route.  This way if you wanted to visit several destinations you could map your route from A to B to C to D.  A, B, C, D could be markers on the map and/or street addresses.  Keep in mind that when you add a destination it becomes the new 'Ending At' point so if you are going to get directions for multiple points your first ending point should be your first stop after leaving your 'Starting At' point.  Enter all points after that in sequence.***  
  • Back to Main View:  If you decide to quit this effort click here or just click outside the dialogue box anywhere on the map.

***If you wanted to you could have the same start and end points on a map with multiple points creating a circular route.  You could even have a sequence which repeated some points such as you leave point A, drop off something at point B, got to point C, D and E, return to point B and pick up something and then return to point A.

<>


Practice Map

Here's your practice map.  You'll notice I used a different map than the one used with this tutorial's examples.  This was done to 'force' you to apply what we've displayed here.


Don't be shy, you can't hurt anything.  To return the map to its original view click the 'Return' button or your browser's refresh button.
<>
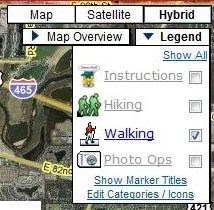
Map Tools 4] Controlling What Shows:  "Clearing the Clutter"

As stated above we will now deal with the 'Legend' and related items:

A
  B
C
By clicking on the Legend [A] a drop down menu [B] appears .
There are four icons [
Lil G, i, walking_icon,photo_ops, 4 titles [Instructions, Hiking, Walking, and Photo Ops] with 4 corresponding checkable boxes.
Whenever you visit a map if there are a lot of points of interest, represented by markers, you may find the map is very cluttered.  Especially if the markers are large or positioned close together.  This could be even worse if all the markers on the map are also labeled.
The way map makers get around this, or better yet, make it possible for you to control, is to 'categorize' their markers.  In this case each set of icon, title and check boxes represent one of four categories.  Instructions, Hiking, Walking and Photo Opps markers.
You will notice that in B only the Walking box is checked.  In this example only the Walking markers will appear on the map.  You control what shows by how many boxes you check or uncheck.  If you want all markers to show you can check all 4 boxes or click the 'Show All' link.
If you want to display the 'Label' for the Markers click the 'Show Marker Titles' link [which will then change to a 'Hide Marker Titles' link].  Ignore the 'Edit Categories/Icon' link in the example it normally would not be visible to users.

Some maps will have a 'tabbed' section [C] which provide additional options and information for users.  In C there is a 'tabbed' section with two tabs, 'Locations' and 'Welcome'.  In this example clicking the 'Welcome' tab would display that tabs page which contains a welcome message and instructions.

The 'Locations' tab is already selected and in this example contains information similar to what is found in the 'Legends' [B] drop down menu except with additional information.  The '-' serve the same purpose as the Legends checkboxes.  Clicking a '-' sign is the same as un-checking one of the Legends boxes.  It will remove all the corresponding markers from the page, change the '-' to a '+' and collapse the list of markers for that category.  Clicking the '+' is the same as checking a box and it will change to a '-' and the list of markers for that category will reappear.
Notice that with each marker and marker label/title displayed are little Icons.  These are shortcuts to features contained in each markers dialogue boxes.  Earlier we explained that if you clicked a marker on the map or a markers label a dialogue box would open with information, maybe a small picture and options for getting driving instructions or viewing that picture[s].  In the Location Tabs clicking on the markers title will do the same but if you click on the little icons instead you will go straight to the those options without opening the dialogue box.  Clicking the car icon will take you straight to the get directions box.  Clicking the camera icon will take you straight to the enlarged pictures.  Notice that not all marker titles have a picture icon because there are no pictures for that marker.
The 'Collapse All' and 'Expand All' does the same as 'Show All Markers' and 'Hide All Markers' in the Legend drop down menu.  The 'Show Descriptions' and 'Show Addresses' are self explanatory when you click them, if available.  The 'Walking Map' link is an Ad [discussed earlier].

<>


Ta Daaa!!!!

udaman There you have it.ugogirl
Now you are a master navigator.
A virtuoso of mapology.
A guru of getting there.
A one person GPS

Remember that all mapping software may not use the same terminology as we use here and all map elements may not always appear on all maps and most of all you can't break it if you don't play with it, if you do break it just close the window and whistle.
 DoanythngRight_289x300
.computerrage
<>


Copyright © 1992-2013 Glenn D. Littrell
www.Glenns-World.com
www.glennlittrell.com 
www.littrellfamily.net 

     love2Bmy2Bcomputer1  

Power Food Chart:

Print* & Carry With Your Shopping List Or Cookbook
  Apples Protects your heart prevents constipation Blocks diarrhea Improves lung capacity Cushions joints
Apricots Combats cancer Controls blood pressure Saves your eyesight Shields against Alzheimer's Slows aging process
Artichokes Aids digestion Lowers cholesterol Protects your heart Stabilizes blood sugar Guards against liver disease
Avocados Battles diabetes Lowers cholesterol Helps stops strokes Controls blood pressure Smoothes skin
Bananas Protects your heart Quiets a cough Strengthens bones Controls blood pressure Blocks diarrhea
Beans Prevents constipation Helps hemorrhoids Lowers cholesterol Combats cancer Stabilizes blood sugar
Beets Controls blood pressure Combats cancer Strengthens bones Protects your heart Aids weight loss
Blueberries Combats cancer Protects your heart Stabilizes blood sugar Boosts memory Prevents constipation
Broccoli Strengthens bones Saves eyesight Combats cancer Protects your heart Controls blood pressure
Cabbage Combats cancer Prevents constipation Promotes weight loss Protects your heart Helps hemorrhoids
Cantaloupe Saves eyesight Controls blood pressure Lowers cholesterol Combats cancer Supports immune system
Carrots Saves eyesight Protects your heart Prevents constipation Combats cancer Promotes weight loss
Cauliflower Protects against Prostate Cancer Combats Breast Cancer Strengthens bones Banishes bruises Guards against heart disease
Cherries Protects your heart Combats Cancer Ends insomnia Slows aging process Shields against Alzheimer's
Chestnuts Promotes weight loss Protects your heart Lowers cholesterol Combats Cancer Controls blood pressure
Chili
peppers
Aids digestion Soothes sore throat Clears sinuses Combats Cancer Boosts immune system
Figs Promotes weight loss Helps stops strokes Lowers cholesterol Combats Cancer Controls blood pressure
Fish Protects your heart Boosts memory Protects your heart Combats Cancer Supports immune system
Flax Aids digestion Battles diabetes Protects your heart Improves mental health Boosts immune system
Garlic Lowers cholesterol Controls blood pressure Combats cancer kills bacteria Fights fungus
Grapefruit Protects against heart attacks Promotes Weight loss Helps stops strokes Combats Prostate Cancer Lowers cholesterol
Grapes saves eyesight Conquers kidney stones Combats cancer Enhances blood flow Protects your heart
Green tea Combats cancer Protects your heart Helps stops strokes Promotes Weight loss Kills bacteria
Honey Heals wounds Aids digestion Guards against ulcers Increases energy Fights allergies
Lemons Combats cancer Protects your heart Controls blood pressure Smoothes skin Stops scurvy
Limes Combats cancer Protects your heart Controls blood pressure Smoothes skin Stops scurvy
Mangoes Combats cancer Boosts memory Regulates thyroid aids digestion Shields against Alzheimer's
Mushrooms Controls blood pressure Lowers cholesterol Kills bacteria Combats cancer Strengthens bones
Oats Lowers cholesterol <> Chart is
courtesy of Mary C. [Littrell] Cook
I don't know the source for this chart, what it's based on, or the significance of the 'color' coding.  Feel free to update us if you
can.
All items are common food items but to be safe checks your prescriptions for contradictions.
* To print use 'Print Preview' and scale to fit chart on one page and then print that page.

Happy Birthday: Shilyn

-click the arrow to start/restart the slide show and videos-


Your part of our favorite trio: "Tracy & The Girls!"
36_27_2


Love You Girrrl!

HAPPY BIRTHDAY


What Is It?

I went to my storage unit last week to pick some things up and there  was this family cleaning out their unit. When coming down on the elevator I noticed this item and asked them about it. They said they had purchased it at a garage sale years ago for $100. The owner told me that it was a knife sharpener but actually its a “knife cleaner”:  Apparently before the use of stainless steel to make knifes cleaning table and carving was quite a chore, especially for servants in upper class homes in England.

“1895 Spong and Co were still manufacturing the ‘Original Sausage and General Mincing Machine’, plus a further four mincing machines that had been developed over the intervening years. Two coffee and/or spice mills were also developed. Knife cleaning machines included, the ‘Non-XL Knife Cleaners’, cleaning between three and ten knives at a time made as a table top or free standing machine, and the ‘Servants Friend’ and ‘Lady’s Knife Cleaner’ that cleaned between one and three knives at a time - both used the friction of leather pads and emery powder to clean the knife blades.”    made by Spong and Company of London

There was also another company in England making this device which appears to have an older claim to its invention:

“…it was use to clean knifes back in the day before they were stainless steel. …made by George Kent of High Holborn, London. Knives are placed in the slots at the top of the rotary oak box. Inside are roller sharpeners, and felt buffers and bristles which clean and polish both sides of the knife at the same time. An abrasive powder is poured through the chute. The rotary action constantly raises the polishing powder from the supply chute.”            for more pictures from Kent click here

Her are the un-blurred, original pictures:

IMG_0521

The ‘slots’ and ‘guides’ to the left and top [3 total] is were the knifes were inserted

IMG_0522The crank was then turned to clean the knifes.
IMG_0523 IMG_0524

Highly unlikely that anyone's old enough to have seen one of these in action before, but maybe one of my ‘elder’ cousins may have.

It was invented circa 1895 or earlier but eventually became obsolete. There were at least two companies making this device in 1895.